
- Howto documents
- Using CVC CAs for EU EAC ePassports
- Djigzo email gateway and EJBCA integration
- Microsoft smart card logon
- Migrating from other CAs to EJBCA
- EJBCA and Apple iOS
- EJBCA and Cisco IOS
- OpenSSH and X509 authentication
- Configure EJBCA with Sun Access Manager/OpenSSO
- Setting up an Apache Web Server as a proxy in front of EJBCA
- Setting up an Apache Web Server with mod_jk in front of EJBCA
- Setting up Autoenrollment for Windows clients with EJBCA
- Current status and known issues
- Machines and software
- Install EJBCA
- Setting up Kerberos authentication and Apache
- Set up enrollment scripts to run automatically
- Debugging
- References
- EJBCA with GemSAFE Toolbox
- Creating and Running a custom RA Administrator application using EJBCA Web Services and Java
- SensorNet PKI
- Documentation in French/en francais
Howto documents
A number of other, mostly outdated, HOWTO documents are available in the doc/howto directory in the source distribution.
Using CVC CAs for EU EAC ePassports
Usage of EJBCA for a complete PKI for CVC CAs are explained in this document.
Djigzo email gateway and EJBCA integration
This guide explains how to configure a Djigzo gateway to make the gateway request certificates from an external EJBCA server. Djigzo Email Encryption Gateway is a standards based centrally managed email server (MTA) that encrypts and decrypts your incoming and outgoing email at the gateway level.
This is an extract from the complete guide, Djigzo EJBCA Setup Guide.
By using the Djigzo-EJBCA integration Djigzo can automatically request certificates from EJBCA for a transparent email encryption experience.
Setting up Djigzo to work with EJBCA contains of a few simple steps:
Create certificate for Djigzo
Djigzo communicates with EJBCA using the WebService interface. This means that Djigzo needs an administrator certificate from EJBCA before is can connect to EJBCA.
Create a new administrator keystore for Djigzo in EJBCA.
- Create a P12 keystore for administrator.
- Add the administrator certificate to an administrator group in EJBCA with RA provileges, i.e. privileges to add/edit end entities.
Configure Djigzo
- Configure the EJBCA certificate request handler in conf/spring/certificate-request-handlers.xml.
- Configure properties as described in the Djigzo EJBCA Setup Guide.
Configure EJBCA
- Create a Certificate Profile with.
- Key Usage: Digital Signature and Key encipherment.
- Extended Key Usage: Any Extended Key Usage or Email Protection (but not both).
- Create an End Entity Profile with.
- RFC 822 Name as Subject Alternative Name.
When the setup is done you can select the EJBCA Certificate Request Handler in the CA configuration of Djigzo.
Microsoft smart card logon
PrimeKey has made a detailed guide how you set up and configure Windows and EJBCA for Windows SmartCard Logon. The guide is divided in three section, introduction, Windows configuration and PKI configuration. The reason for this division is that you can give the Windows guide to the windows administrator, who can easily follow this guide on the Windows servers, while the PKI can be a hosted service or operated by another department.
The scripts and profiles can be fetched here.
Migrating from other CAs to EJBCA
Migrating an OpenSSL based CA
This article is written for an older version of EJBCA. Now there is a command to import a PKCS#12 file, also in the Admin-GUI under "Edit Certificate Authorities->Import CA keystore".
The cli command to import a PKCS#12 file is now called bin/ejbca.sh ca importca ....
The cli command to import user certificates is now called bin/ejbca.sh ca importcert ....
Read the howto at Csita.
Migrating RSA Keon CA with nCipher
This document describes how to migrate an RSA Keon CA using nCipher HSM to EJBCA.
The migration guide goes through migrating the CA signing keys, importing the CAs to EJBCA and importing
issued certificates to EJBCA. The result is a setup in EJBCA that can continue operation transparently.
Download EJBCA migration guide (pdf).
EJBCA and Apple iOS
You can enroll certificates for the iOS directly with EJBCA using SCEP. There is a SCEP profile in the iPhone that you can use for this. PrimeKey has created a detailed howto if you need this type of support. It works according to the same principals as the examples below.
EJBCA and Cisco IOS
This howto is contributed by Bruno Bonfils.
There is a Cisco emulator available.
Here is the IOS config related to the CA:
!
crypto ca trustpoint FMSCA
enrollment url http://your.ca.host.name:8080/ejbca/publicweb/apply/scep
serial-number
source interface Ethernet0
auto-enroll regenerate
!
- The enrollment line tell how (the method, here an http url) to contact the PKI software. Note: you must omit the pkiclient.exe filename at the end which is automagically add by IOS.
- The serial-number tells IOS to include the serial number in the request.
- The name of the trustpoint you use MUST MATCH exactly the shortname of your CA in EJBCA (here FMSCA).
# crypto ca authenticate FMSCA
to fetch the CA certificate.
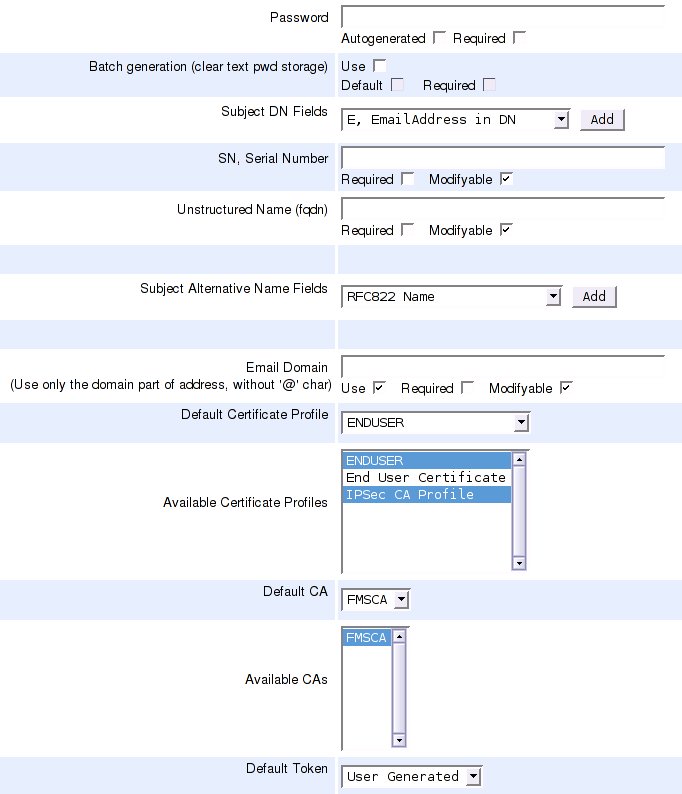
Then, login to EJBCA, and create a new entity profile that looks like:
Then, do the password enrollment with the command:
# crypto ca enroll FMSCA
Check your ejbca logs, you should see something like:
ERROR [PKCS10RequestMessage] No CN in DN: SN=12013150+unstructuredName=your.ciscobox.hosts.name
ERROR [Log4jLogDevice] October 19, 2005 9:48:33 AM CEST, CAId : 0, CA, EVENT_ERROR_USERAUTHENTICATION, Administrator : \
PUBLICWEBUSER, IP Address : 192.168.134.1, User : 12013150, Certificate : No Certificate Involved, Comment : \
Got request for nonexisting user: 12013150
So, you know you must add an entity using the serial number as username, the password you define in IOS, and serialNumber/unstructuredNamed as subject DN fields.
After adding the end entity, do the password enrollment again. If you see this you have enrolled succesfully:
saroumane#sh crypto ca cert
Certificate
  Status: Available
  Certificate Serial Number: 426FA96340F5D2CA
  Certificate Usage: General Purpose
  Issuer:
    c=FR
    o=Fimasys
    cn=Fimasys Security CA
  Subject:
    Name: your.ciscobox.hosts.name
    Serial Number: 12013150
    serialNumber=12013150
    hostname=your.ciscobox.hosts.name
  Validity Date:
    start date: 08:58:28 CET Oct 19 2005
    end   date: 09:08:28 CET Oct 19 2007
  Associated Trustpoints: FMSCA

CA Certificate
  Status: Available
  Certificate Serial Number: 7AA2B9942CD0D362
  Certificate Usage: Signature
  Issuer:
    c=FR
    o=Fimasys
    cn=Fimasys Security CA
  Subject:
    c=FR
    o=Fimasys
    cn=Fimasys Security CA
  Validity Date:
    start date: 07:29:35 CET Oct 17 2005
    end   date: 07:39:35 CET Oct 15 2015
  Associated Trustpoints: FMSCA
Cisco IOS simulator
There is a Cisco 7200 emulator called dynamips available and a graphical front end GNS3.
Below is a short run through how to configure and enroll directly with EJBCA using GNS3 on Ubuntu 8.10.
sudo apt-get install gns3 uml-utilities bridge-utils
Now you have to configure the host and gns3 to be able to communicate with each other, so the router can connect to EJBCA on the host computer. This is taken from http://www.blindhog.net/linux-bridging-for-gns3-lan-communications/".
1. Create a tap interface
   sudo tunctl -t tap0
2. Remove ip addressing and set eth0 and tap0 to promiscuous mode
   sudo ifconfig tap0 0.0.0.0 promisc up
   sudo ifconfig eth0 0.0.0.0 promisc up
3. Create a new bridge interface
   sudo brctl addbr br0
4. Add tap0 and eth0 to the bridge group
   sudo brctl addif br0 tap0
   sudo brctl addif br0 eth0
5. Enable the bridge interface and give it an ip address
   sudo ifconfig br0 up
   sudo ifconfig br0 10.10.10.99/24
6. Configure the default route
   sudo route add default gw 10.10.10.254
Now start gns3.
sudo gns3
Configure with IOS image, for example c7200-jk9s-mz.124-13b.bin (an image with crypto commands), it's available on the net. Also configure a simple topology:
- drag cloud to topology window
- drag c7200 to topology window
- configure cloud and add tap0 interface
- add manual link from cloud to c7200
- start c7200
- open console on c7200
- enter configuration and configure FastEthernet0/0 with ip 10.10.10.98/255.255.255.0
Router>enable
Router#configure terminal
Router(config)#
Router(config)#crypto ca trustpoint ScepCA

Router(ca-trustpoint)#enrollment url http://10.10.10.99:8080/ejbca/publicweb/apply/scep
Router(ca-trustpoint)#serial-number
Router(ca-trustpoint)#ip-address none
Router(ca-trustpoint)#subject-name OU=Network Management, O=PrimeKey Solutions AB, C=SE
Router(ca-trustpoint)#revocation-check none
Router(ca-trustpoint)#exit

Router(config)#crypto ca authenticate ScepCA
Router(config)#crypto ca enroll ScepCA
You will see in the log what the username of the user you must create is called. create end entity profile and user with DN containing SN=FFFFFF and unstructuredName=Router, as seen in the log file (FFFFFF and Router are the default values in the simulator).
Router(config)#crypto ca enroll ScepCA
Router(config)#exit
Router#show crypto ca certificate
You can always look at the defined trustpoints using the command:
Router#show crypto ca trustpoints
If you are enrolling towards an RA instead (see External RA documentation for information how to set up an external RA for SCEP) you issue the following commands:
Router>enable
Router#configure terminal
Router(config)#
Router(config)#crypto ca trustpoint ScepRA

Router(ca-trustpoint)#enrollment url http://10.10.10.99:8080/scepraserver/scep
Router(ca-trustpoint)#enrollment mode ra
Router(ca-trustpoint)#serial-number
Router(ca-trustpoint)#ip-address none
Router(ca-trustpoint)#subject-name OU=Network Management, O=PrimeKey Solutions AB, C=SE
Router(ca-trustpoint)#revocation-check none
Router(ca-trustpoint)#exit

Router(config)#crypto ca authenticate ScepRA
Router(config)#crypto ca enroll ScepRA
Note! This would only have a chance to work in EJBCA 3.8.1 and later, and actually it does not work due to the following error in Cisco. If you have any ideas, please contact us.
Router#debug crypto pki API
Router#debug crypto pki messages
Router#debug crypto pki server
Router#debug crypto pki transactions
Router#debug crypto pki validation

...

*Jan 16 21:47:32.546: CRYPTO_PKI: make trustedCerts list for ScepRA
*Jan 16 21:47:32.550: CRYPTO_PKI: subject="c=SE,o=Foo,cn=Scep RA" serial number= 3A 46 2F B4 5B AC 06 47

*Jan 16 21:47:32.554: CRYPTO_PKI: subject="c=SE,o=EJBCA Sample,cn=ScepCA" serial number= 19 A6 7D 78 AF 9D 3B 27

*Jan 16 21:47:32.566: E ../cert-c/source/p7digdat.c(377) : Error #703h
*Jan 16 21:47:32.566: E ../cert-c/source/p7spprt.c(589) : Error #703h
*Jan 16 21:47:32.582: pkcs7 verify data returned status 0x703
*Jan 16 21:47:32.582: CRYPTO_PKI: status = 1795: failed to verify
*Jan 16 21:47:32.582: %PKI-6-CERTFAIL: Certificate enrollment failed.
*Jan 16 21:47:32.582: CRYPTO_PKI: All enrollment requests completed for trustpoint ScepRA.
OpenSSH and X509 authentication
Bruno Bonfils has written this excellent howto on using SSH with certificates from EJBCA:
OpenSSH and X509 authentication.
Another interesting link is this one:
PKCS#11 support in OpenSSH.
Configure EJBCA with Sun Access Manager/OpenSSO
EJBCA can issue certificates to be used when protecting sites using OpenSSO (Sun's Access Manager). EJBCA will then be configured to publish issued certificates to the AM LDAP server.
The configuration is really simple and after installing EJBCA consists of only these steps:
- Create a Publisher, AMPublisher with the following properties:
- Publisher Type: LDAP V3 Search Publisher
- Base DN: The Base DN in the AM LDAP, for example dc=company,dc=com
- Login parameters to the AM LDAP server
- Create Nonexisting Users: false
- Modify Existing Users: true
- Add multiple certificates per user: false
- Remove certificates when revoked: true
- Remove ldap user when certificate revoked: false
- LDAP location fields from cert DN: CN, Common Name (not really used)
- Suffix base DN of the LDAP Search: same as Base DN, for example dc=company,dc=com
- LDAP filter of the search: uid=$USERNAME
- Create a Certificate Profile, AMUser:
- Use ENDUSER as template when creating the profile
- Extended Key Usage: Client Authentication
- Publishers: AMPublisher
- Create an End Entity Profile, AMUser:
- Subject DN Fields: UID, CN, O, C is sufficient
- Default Certificate Profile: AMUser
- Available Certificate Profiles: AMUser
- Create a new user in AM
- Create a new user in EJBCA with the same username and UID as the username in AM
- Get the certificate for the user, for example with the user's browser on the public web pages of EJBCA
EJBCA - OpenSSO Integration articles
A really good article and description about EJBCA and OpenSSO is written by Bruno Bonfils.
This paper also describes easy integration between EJBCA and OpenSSO, where EJBCA is used for user provisioning.
Setting up an Apache Web Server as a proxy in front of EJBCA
This section will show you how to use an Apache Web Server Proxy in front of EJBCA. The resulting server will
- Display EJBCA public web at https://ca-server.company.local/
- Redirect all HTTP-requests to HTTPS, except for OCSP and CRL.
- Require a client SSL certificate when accessing https://ca-server.company.local/adminweb/
- Be able to loadbalance requests
- Still answer to requests on https://ca-server.company.local/ejbca/*
This example was created on Ubuntu 64-bit Server 7.10 using the Apache Web Server 2.2 package, but should be easy to adapt to any system able to run Apache.
Start by installing EJBCA as normal. If you intend to have the CA on the same machine as the proxy you should modify $EJBCA_HOME/conf/web.properties to only listen to localhost
  httpsserver.bindaddress.pubhttp=127.0.0.1
  httpsserver.bindaddress.pubhttps=127.0.0.1
  httpsserver.bindaddress.privhttps=127.0.0.1
Install the Apache web server and enable required modules:
  $sudo su
  #apt-get install apache2
  #cd /etc/apache2/mods-enabled/
  #ln -s ../mods-available/proxy.load proxy.load
  #ln -s ../mods-available/proxy_http.load proxy_http.load
  #ln -s ../mods-available/proxy_ajp.load proxy_ajp.load
  #ln -s ../mods-available/proxy_balancer.load proxy_balancer.load
  #ln -s ../mods-available/rewrite.load rewrite.load
  #ln -s ../mods-available/ssl.load ssl.load
Generate the SSL-certificate for Apache. This should be issued by the same CA that issued the Tomcat SSL certificate (AdminCA1 in the default configuration). This can be done with the EJBCA CLI:
  $ cd $EJBCA_HOME
  $ bin/ejbca.sh ra adduser apache-ssl foo123 "CN=ca-server.company.local,O=EJBCA Sample,C=SE" "" AdminCA1 "" 1 PEM SERVER
  $ bin/ejbca.sh ra setclearpwd apache-ssl foo123
  $ bin/ejbca.sh batch
  $ ls p12/pem/ca-server.company.local*
  p12/pem/ca-server.company.local-CA.pem  p12/pem/ca-server.company.local-Key.pem  p12/pem/ca-server.company.local.pem
Configure the default virtual host-file /etc/apache2/sites-enabled/000-default
See for example the Debian advisory.
NameVirtualHost *:80
<VirtualHost *:80>
        DocumentRoot /var/www/

        # Proxy requests to EJBCA instances (only one on local machine configured)
        <Proxy balancer://mycluster-kerb>
                BalancerMember ajp://localhost:8009/ejbca/
        </Proxy>
        ProxyPass / balancer://mycluster-kerb/

        RewriteEngine   On
        # Redirect all but the CRL Distribution Point, OCSP and Helthcheck to HTTPS
        RewriteCond     %{THE_REQUEST} !(/publicweb/webdist/certdist.*cmd=crl|/publicweb/status/)
        RewriteRule     ^(.*)$ https://%{SERVER_NAME}$1 [L,R]
        # Treat reqeusts to / and /ejbca/ as the same. Required by EJBCA's Admin Web.
        RewriteCond     %{THE_REQUEST}  /ejbca/
        RewriteRule     ^/ejbca/(.*)$ /$1 [PT]

        # Configure log
        LogLevel warn
        ErrorLog /var/log/apache2/error.log
        CustomLog /var/log/apache2/access.log combined
</VirtualHost>

NameVirtualHost *:443
<VirtualHost *:443>
        DocumentRoot /var/www/

        RewriteEngine   On
        # Treat reqeusts to / and /ejbca/ as the same. Required by EJBCA's Admin Web.
        RewriteCond     %{THE_REQUEST}  /ejbca/
        RewriteRule     ^/ejbca/(.*)$ /$1 [PT]

        # Configure secure SSL for this server using SSL certificate generated by EJBCA
        SSLEngine on
        SSLCipherSuite HIGH
        SSLProtocol all -SSLv2
        SSLCertificateFile /home/jboss/ejbca/p12/pem/ca-server.company.local.pem
        SSLCertificateKeyFile /home/jboss/ejbca/p12/pem/ca-server.company.local-Key.pem

        # Require Client SSL certificate  for the Admin GUI
        <Location /adminweb>
                SSLVerifyClient require
                SSLVerifyDepth 1
                SSLCACertificateFile /home/jboss/ejbca/p12/pem/ca-server.company.local-CA.pem
        </Location>

        # Proxy requests to EJBCA instances (only one on local machine configured)
        <Proxy balancer://mycluster-kerb>
                BalancerMember ajp://localhost:8009/ejbca/
        </Proxy>
        ProxyPass / balancer://mycluster-kerb/

        # Configure log
        LogLevel warn
        ErrorLog /var/log/apache2/error.log
        CustomLog /var/log/apache2/access.log combined
</VirtualHost>
Reload the apache configuration and verify that only port 80, 443 and other desired services (e.g. a ssh-daemon) are listening on all or external interfaces
  $sudo /etc/init.d/apache2 reload
  $sudo netstat -nap | grep LISTEN | grep -v 127.0.0.1
    tcp        0      0 0.0.0.0:80              0.0.0.0:*               LISTEN     7612/apache2
    tcp        0      0 0.0.0.0:443             0.0.0.0:*               LISTEN     7612/apache2
    tcp6       0      0 :::22                   :::*                    LISTEN     3746/sshd
Even though this looks secure, it is still a good idea to use a firewall as an extra layer of security (e.g. drop malformed packages and prevent future services from being exploited).
*** Nice URLs ***
A sample configuration how to fix up nice URLs for OCSP so that you can point your OCSP service locator to http://ocsp.company.com/ instead of http://ocsp.company.com:8080/ejbca/publicweb/status/ocsp (some info left out for brevity).
<VirtualHost ocsp.company.com:80>
    <Proxy *>
        Order deny,allow
        Allow from all
    </Proxy>
    ProxyPass / http://127.0.0.1:8080/ejbca/publicweb/status/ocsp
    ProxyPassReverse / http://127.0.0.1:8080/ejbca/publicweb/status/ocsp
</VirtualHost>
You can easily do the same for CRL distribution points.
Setting up an Apache Web Server with mod_jk in front of EJBCA
Instead of using a proxy you can use mod_jk which uses a JK connector between apache and tomcat. I think this have some benefits. You can easily combine it with mod_rewrite to have any type of external URLs, for OCSP, CRLs etc, and mapping them to other URLs in EJBCA.
This section will show you how to use an Apache with mod_jk in front of EJBCA. The resulting server will
- Display EJBCA public web at http://demo.primekey.se/
- Require a client SSL certificate when accessing https://demo.primekey.se/, which works for the admin-GUI.
This example was created on Ubuntu 64-bit Server 8.10 using the Apache Web Server 2.2 package, but should be easy to adapt to any system able to run Apache.
# sudo apt-get install apache2 libapache2-mod-jk
# vim /etc/libapache2-mod-jk/workers.properties
-----
worker.list=jboss

# Define a worker using ajp13
worker.jboss.port=8009
worker.jboss.host=127.0.0.1
worker.jboss.type=ajp13
-----
# vim /etc/apache2/sites-available/demo.primekey.se
-----
<VirtualHost demo.primekey.se:80>
  # We must disable default charset or everything will be ISO-8859-1,
  AddDefaultCharset off
  ServerAdmin webmaster@primekey.se
  ServerName demo.primekey.se
  ServerAlias demo.primekey.se

  JkLogFile /var/log/apache2/mod_jk.log
  JkLogLevel debug

  JkMount /* jboss
  JkMount / jboss
</VirtualHost>

<VirtualHost demo.primekey.se:443>>
  # We must disable default charset or everything will be ISO-8859-1,
  AddDefaultCharset off
  ServerAdmin webmaster@primekey.se
  ServerName demo.primekey.se
  ServerAlias demo.primekey.se

  SSLEngine on

  JkLogFile /var/log/apache2/mod_jk.log
  JkLogLevel debug

  JkMount /* jboss
  JkMount / jboss

  # JkExtractSSL is On by default
  # JkExtractSSL On
</VirtualHost>
-----
# vim /etc/apache2/mods-available/ssl.conf
-----
SSLVerifyClient require
SSLVerifyDepth 3

SSLCACertificateFile /etc/apache2/ssl/apache-CA.pem
SSLCertificateFile /etc/apache2/ssl/apache.pem

SSLOptions +StdEnvVars +ExportCertData
-----
# vim /etc/apache2/mods-available/jk.load
-----
LoadModule jk_module /usr/lib/apache2/modules/mod_jk.so
JkWorkersFile /etc/libapache2-mod-jk/workers.properties
-----
Now enable ssl.load and ssl.conf in /etc/apache2/mods-enabled.
Finally restart apache and go to http://demo.primekey.se/ (or https). Same security considerations as for using proxy applies.
If you are using the external OCSP responder then you also got to ensure you got this line in the file apache2.conf:
KeepAlive Off
If not apache will hang.
Also an external OCSP responder it could be good to add these lines to the 'Virtual Host' configuration:
  RewriteEngine on
  RewriteRule .* /ejbca/publicweb/status/ocsp [PT]

  JkMount /ejbca/publicweb/status/ocsp/* ocsp_worker
  JkMount /ejbca/publicweb/status/ocsp ocsp_worker
By doing this you don't have to bother about typing the last part of the URL. Just right server name will do.
Setting up Autoenrollment for Windows clients with EJBCA
This section will show you how to set up automatic certificate enroll of machines and users in an Windows environment with EJBCA.
General idea
- Use mod_auth_kerb on a Apache2 web server proxy to validate the requesters identity using Kerberos.
- A login VBS-Script creates a certificate request that is sent to the proxy using IE-components.
- A Servlet protected by the proxy receives the requests and creates a new cert.
- The new certificate will use information from the request (UPN and CertificateTemplate) and read.
- information from active directory (CN,DC etc).
- Autoenrollment should be configurable in the Admin GUI.
Current status and known issues
Current status
- Machine enroll on Domain Controller: WORKING
- DomainController enroll on Domain Controller: WORKING
- User enroll (Administrator) on Domain Controller: NOT WORKING (Does not trusts ca-server as Intranet, despite GP)
- Machine enroll on other WS2K3 client: WORKING (not checked in a while)
- User enroll (Administrator) on other WS2K3 client: NOT WORKING (Does not trusts ca-server as Intranet, despite GP, also complains about untrusted VBS if ran manually)
- Machine enroll on WinXP client: WORKING
- User enroll (Administrator) on WinXP client: WORKING
Known issues
- SECURITY: The Servlet should verify that e.g. only Users can request User certificates, DCs only DC certs etc.. and other permissions if possible.
- The enroll scripts always fetches new certificates. They should use the command=status first to see if a new cert is needed.
- AdminWeb cannot verify admin certificates if non-"/ejbca/" path is used in URL.
- Autoenroll Servlet doesn't get X-Remote-User if "/ejbca/" path is used in URL.
- Order of Subject DNs is wrong compared with MS certs..
- SSL connection to AD has not been tested.
- Certificates don't have the CertificateTemplate attrib yet.. looks nicer in Certificate MMC snapin..
- JavaScript "onchange" behaves strangely in IE6. Only activated when the table is clicked, not the checkbox..
- Creation of EEPs is inefficient due to attempted removal of EEP before each new request.. (Debug-code)
...
Machines and software
Domain Controller: dc1.company.local
- Windows Server 2003 EE patched to SP2
- Active Directory
- DNS Server
CA Server: ca-server.company.local
- Ubuntu 64 Server 7.10
- Apache2 with modules
- Kerberos 5
- Java 1.6u4
- JBoss 4.2.2.GA
- EJBCA 3.6 Alpha
- Apache Ant 1.7.0
Desktop client: client-01.company.local
- Windows XP Pro SP1 patched to SP2
Install EJBCA
Configure EJBCA not to respond to external web-requests by editing $EJBCA_HOME/conf/web.properties
...
httpsserver.bindaddress.pubhttp=127.0.0.1
httpsserver.bindaddress.pubhttps=127.0.0.1
httpsserver.bindaddress.privhttps=127.0.0.1
...
After installation, go to EJBCA Admin GUI -> System Configuration and configure the autoenrollment settings.
Setting up Kerberos authentication and Apache
This could probably be done on a Windows server as well, since Apache and Kerberos is supposed to work on that platform too..
$sudo su
#apt-get update
#apt-get install krb5-user apache2 libapache2-mod-auth-kerb
 ** Skip kerberos config.. we will configure this later **
#cd /etc/apache2/mods-enabled/
#ln -s ../mods-available/proxy.load proxy.load
#ln -s ../mods-available/proxy_ajp.load proxy_ajp.load
#ln -s ../mods-available/proxy_balancer.load proxy_balancer.load
#ln -s ../mods-available/rewrite.load rewrite.load
#ln -s ../mods-available/ssl.load ssl.load
#ln -s ../mods-available/headers.load headers.load
Edit /etc/krb5.conf where dc1.company.local is the DNS-name of the Domain Controller and COMPANY.LOCAL is our domain.
[libdefaults]
default_realm = COMPANY.LOCAL

[realms]
COMPANY.LOCAL = {
    kdc = dc1.company.local:88
    admin_server = dc1.company.local:88
}

[domain_realm]
    .company.local = COMPANY.LOCAL
    company.local = COMPANY.LOCAL

[logging]
default = FILE:/var/log/apache2/krb5.log
Edit /etc/network/interfaces and set a static IP address
...
#iface eth0 inet dhcp
iface eth0 inet static
    address 192.168.0.102	# Address of this machine
    netmask 255.255.255.0
    gateway 192.168.0.101	# In our local network this is the Domain Controller
Use the DC as DNS server in /etc/resolv.conf
search localdomain
nameserver 192.168.0.101
and restart networking (sudo /etc/init.d/networking restart).
Add "ntdpdate dc1.company.local" to /etc/rc.local or a cron job to make sure the ca-server is syncronized with the Domain Controller.
Create the SSL certificates for the Apache proxy using the same CA as our EJBCA installation and the same subject DN.
$cd $EJBCA_HOME
$bin/ejbca.sh ra adduser apache-ssl foo123 "CN=ca-server.company.local,O=EJBCA Sample,C=SE" "" AdminCA1 "" 1 PEM SERVER
$bin/ejbca.sh ra setclearpwd apache-ssl foo123
$bin/ejbca.sh batch
$ls p12/pem/ca-server.company.local*
p12/pem/ca-server.company.local-CA.pem  p12/pem/ca-server.company.local-Key.pem  p12/pem/ca-server.company.local.pem
Edit /etc/apache2/sites-enabled/000-default to display an apache proxy front for EJBCA
NameVirtualHost *:80
<VirtualHost *:80>
        DocumentRoot /var/www/

        # Proxy requests to EJBCA instances (only one on local machine configured)
        <Proxy balancer://mycluster-kerb>
                BalancerMember ajp://localhost:8009/ejbca/
        </Proxy>
        ProxyPass / balancer://mycluster-kerb/

        RewriteEngine   On
        # Redirect all but the CRL Distribution Point, OCSP and Helthcheck to HTTPS
        RewriteCond     %{THE_REQUEST} !(/publicweb/webdist/certdist.*cmd=crl|/publicweb/status/)
        RewriteRule     ^(.*)$ https://%{SERVER_NAME}$1 [L,R]
        # Treat reqeusts to / and /ejbca/ as the same. Required by EJBCA's Admin Web.
        RewriteCond     %{THE_REQUEST}  /ejbca/
        RewriteRule     ^/ejbca/(.*)$ /$1 [PT]

        # Configure log
        LogLevel warn
        ErrorLog /var/log/apache2/error.log
        CustomLog /var/log/apache2/access.log combined
</VirtualHost>

NameVirtualHost *:443
<VirtualHost *:443>
        DocumentRoot /var/www/

        RewriteEngine   On
        # Treat reqeusts to / and /ejbca/ as the same. Required by EJBCA's Admin Web.
        RewriteCond     %{THE_REQUEST}  /ejbca/
        RewriteRule     ^/ejbca/(.*)$ /$1 [PT]

        # Configure secure SSL for this server using SSL certificate generated by EJBCA
        SSLEngine on
        SSLCipherSuite HIGH
        SSLProtocol all -SSLv2
        SSLCertificateFile /home/jboss/ejbca/p12/pem/ca-server.company.local.pem
        SSLCertificateKeyFile /home/jboss/ejbca/p12/pem/ca-server.company.local-Key.pem

        # Require Client SSL certificate for the Admin GUI
        <Location /adminweb>
                SSLVerifyClient require
                SSLVerifyDepth 1
                SSLCACertificateFile /home/jboss/ejbca/p12/pem/ca-server.company.local-CA.pem
        </Location>

        # Require Kerberos authentication for the Autoenroll Servlet
        <Location /autoenroll>
                AuthType Kerberos
                Krb5Keytab /etc/apache2/http.keytab
                KrbAuthRealms COMPANY.LOCAL
                KrbServiceName HTTP
                KrbMethodNegotiate on
                KrbMethodK5Passwd off
                Require valid-user
        </Location>

        # Forward the UPN as variable X-Remote-User
        RewriteCond %{IS_SUBREQ} ^false$
        RewriteCond %{LA-U:REMOTE_USER} (.+)
        RewriteRule .* - [E=RU:%1]
        RequestHeader set X-Remote-User %{RU}e

        # Proxy requests to EJBCA instances (only one on local machine configured)
        <Proxy balancer://mycluster-kerb>
                BalancerMember ajp://localhost:8009/ejbca/
        </Proxy>
        ProxyPass / balancer://mycluster-kerb/

        # Configure log
        LogLevel warn
        ErrorLog /var/log/apache2/error.log
        CustomLog /var/log/apache2/access.log combined
</VirtualHost>
Restart apache with "sudo /etc/init.d/apache2 restart"
Install Windows support tools on the Domain Controller (found in %WIN2k3CD%\SUPPORT\TOOLS\SUPTOOLS.msi) to get ktpass.exe. Create a new user "ca-server@company.local" and a strong password e.g not FooBar123 used here. Create a keytab-file "http.keytab" on the Domain Controller:
ktpass.exe -princ HTTP/ca-server.company.local@COMPANY.LOCAL -mapuser ca-server -crypto DES-CBC-MD5 -ptype KRB5_NT_PRINCIPAL -mapop set +desonly -pass FooBar123 -out http.keytab
 ...
 keysize 55 HTTP/ca-server.company.local@COMPANY.LOCAL ptype 1 (KRB5_NT_PRINCIPAL) vno 3 etype
 0x3 (DES-CBC-MD5) keylength 8 (0x64614c9d256bcd6d)
 ...
And move the file to ca-server.company.local:/etc/apache2/http.keytab change permissions to be readable only by the apache-process.
$chown root:root /etc/apace2/http.keytab
Verify that the keytab is correct:
$kinit Administrator
$kvno HTTP/ca-server.company.local
$klist -e
** Output here should match the one from ktpass.exe **
Verify that the keytab can be used:
$kdestroy
$sudo kinit -k -t /etc/apache2/http.keytab HTTP/ca-server.company.local
$sudo klist
(You should have received a ticket here if everything is working.)
$sudo kdestroy
Add ca-server.company.local (192.168.1.2) to your Domain Controllers DNS server as a "Host (A)" record.
Set up enrollment scripts to run automatically
Create a Shared directory on the Domain Controller, C:\Shared with read and exec rights by Everyone
copy %SYSTEMROOT%\system32\certreq.exe C:\Shared\Autoenroll\
copy %SYSTEMROOT%\system32\certcli.dll C:\Shared\Autoenroll\
copy %SYSTEMROOT%\system32\certadm.dll C:\Shared\Autoenroll\
(copy %SYSTEMROOT%\system32\certutil.exe C:\Shared\Autoenroll\ This is used by EnrollDomainController and is already available at all DCs.)
Edit or create C:\Shared\Autoenroll\autoenroll.conf
# This is a primitive config file that does not allow spaces

# The request URL is built from the following properties
# https://[requestpath]?request=...
#

# Standard SSL-port and using URL rewrite from /ejbca/* to /*
requestpath=ca-server.company.local/autoenroll

# Non-standard SSL-port and not using URL rewrite
#requestpath=ca-server.company.local:4443/ejbca/autoenroll

# Debug setting, use only for manual testing
#debug=true
debug=false
Edit or create C:\Shared\Autoenroll\RequestAndInstall.vbs
	Set oArgs = WScript.Arguments
	if oArgs.Count < 1 then
		WScript.Echo "Usage: thisscript.vbs fullpathnameofrequest.inf"
		WScript.Quit 1
	else
		sRequestInfo = Trim(oArgs(0))
	end if

	Set WS = CreateObject("WScript.Shell")

	sRequest = WS.ExpandEnvironmentStrings("%TEMP%") & "\autoenrolled.req"
	sResult = WS.ExpandEnvironmentStrings("%TEMP%") & "\autoenrolled.p7b"

	Set oFilesystem = CreateObject("Scripting.FileSystemObject")
	On Error Resume Next	' Ignore if we try to delete a file that does not exist
	oFilesystem.DeleteFile(sRequest)
	Err.Clear
	On Error GoTo 0
	sSharedDir = oFilesystem.GetParentFolderName(WScript.ScriptFullName) & "\"

	Set iFile = oFilesystem.OpenTextFile(sSharedDir & "autoenroll.conf")
	Do While iFile.AtEndOfStream <> True
	    sLine = iFile.Readline
	    If InStr(Left(sLine,1), "#") = 0 then
	        If InStr(sLine, "requestpath=") <> 0 then
		    	sRequestPath = Trim(Right(sLine, Len(sLine)-Len("requestpath=")))
	        end if
	        If InStr(sLine, "debug=") <> 0 then
		    	sDebug = Trim(Right(sLine, Len(sLine)-Len("debug=")))
	        end if
	    End if
	Loop
	iFile.Close

	WS.Run sSharedDir & "certreq.exe -f -new " & sRequestInfo & " " & sRequest, 0, True

	sRequestData = ""
	Set objFile = oFilesystem.OpenTextFile(sRequest, 1)
	Do Until objFile.AtEndOfStream
		sRequestData = sRequestData & objFile.ReadLine
	Loop
	objFile.Close

	set oIE = CreateObject("InternetExplorer.Application")

	oIE.navigate2("https://" & sRequestPath & "?debug=" & sDebug & "&request=" & sRequestData)

	If sDebug = "true" Then
		oIE.visible = true
	End If

	'Wait max 30 seconds
	wscript.sleep 1000
	counter = 0
	While oIE.Busy = true And counter < 30
		counter = counter + 1
		wscript.sleep 1000
	Wend

	sResultData = oIE.Document.Body.innerHTML
	sResultData = Mid(sResultData, 6, Len(sResultData)-11)

	Set oFile = oFilesystem.CreateTextFile(sResult, True)
	oFile.WriteLine sResultData
	oFile.Close

	on error resume next ' in case the Task Manager is used to close IE.
	If sDebug <> "true" Then
		oIE.quit ' Close the window
		WS.Run sSharedDir & "certreq.exe -accept " & Chr(34) & sResult & Chr(34), 0, True
	End If
Edit or create C:\Shared\Autoenroll\EnrollDomainController.vbs
	' This Script is based on the script found at http://www.microsoft.com/technet/prodtechnol/windowsserver2003/technologies/security/advcert.mspx#EURAE

	iRole = GetLastDomainRole()
	If iRole <> 4 And iRole <> 5 Then
		WScript.Echo "This script should only run on a Domain Controller."
		WScript.Quit 1
	End If

	Set WS = CreateObject("WScript.Shell")

	Set objDC = GetObject("LDAP://" & CreateObject("ADSystemInfo").ComputerName)
	sGUID = objDC.GUID
	sDNShostname = objDC.DNShostname

	Set oFilesystem = CreateObject("Scripting.FileSystemObject")
	sTempfilePrefix = WS.ExpandEnvironmentStrings("%TEMP%") & "\autoenrolled"
	sRequestInfo = sTempFilePrefix & ".inf"
	sSharedDir = oFilesystem.GetParentFolderName(WScript.ScriptFullName) & "\"

	'Create b64 encoded extension
	Dim aASNsubstring(2, 5)
	Const HEX_DATA_LENGTH = 1
	Const ASCIIDATA = 2
	Const HEXDATA = 3
	Const HEX_BLOB_LENGTH = 4
	Const HEX_TYPE = 5
	' Encode DNS
	aASNsubstring(0, ASCIIDATA) = sDNShostname
	aASNsubstring(0, HEX_TYPE) = "82"
	For i = 1 to Len(aASNsubstring(0, ASCIIDATA))
	    aASNsubstring(0, HEXDATA) = aASNsubstring(0, HEXDATA) & Hex(Asc(Mid(aASNsubstring(0, ASCIIDATA), i, 1)))
	Next
	aASNsubstring(0, HEX_DATA_LENGTH) = ComputeASN1 (Len(aASNsubstring(0, HEXDATA)) / 2)
	sASN = aASNsubstring(0, HEX_TYPE) & aASNsubstring(0, HEX_DATA_LENGTH) & aASNsubstring(0, HEXDATA)
	' Encode GUID
	aASNsubstring(1, HEXDATA) = sGUID
	aASNsubstring(1, HEX_TYPE) = "A0"
	aASNsubstring(1, HEX_DATA_LENGTH) = ComputeASN1 (Len(aASNsubstring(1, HEXDATA)) / 2)
	sASN = sASN & "A01F06092B0601040182371901" & aASNsubstring(1, HEX_TYPE) & "120410" & aASNsubstring(1, HEXDATA)

	Set oFile = oFilesystem.CreateTextFile(sTempfilePrefix & ".asn")
	oFile.WriteLine "30" & ComputeASN1 (Len(sASN) / 2) & sASN
	oFile.Close
	WS.Run "certutil -f -decodehex " & sTempfilePrefix & ".asn " & sTempfilePrefix & ".bin", 0, True
	WS.Run "certutil -f -encode " & sTempfilePrefix & ".bin " & sTempfilePrefix & ".b64", 0, True

	Set iFile = oFilesystem.OpenTextFile(sTempfilePrefix & ".b64")
	Set oFile = oFilesystem.CreateTextFile(sRequestInfo, True)
	oFile.WriteLine "[Version]"
	oFile.WriteLine "Signature= " & Chr(34) & "$Windows NT$" & Chr(34)
	oFile.WriteLine ""
	oFile.WriteLine "[NewRequest]"
	oFile.WriteLine "Subject = " & Chr(34) & "CN=IgnoredValue" & Chr(34)
	oFile.WriteLine "KeySpec = 1"
	oFile.WriteLine "KeyLength = 2048"
	oFile.WriteLine "Exportable = TRUE"
	oFile.WriteLine "MachineKeySet = TRUE"
	oFile.WriteLine "SMIME = FALSE"
	oFile.WriteLine "PrivateKeyArchive = FALSE"
	oFile.WriteLine "UserProtected = FALSE"
	oFile.WriteLine "UseExistingKeySet = FALSE"
	oFile.WriteLine "ProviderName = " & Chr(34) & "Microsoft RSA SChannel Cryptographic Provider" & Chr(34)
	oFile.WriteLine "ProviderType = 12"
	oFile.WriteLine "RequestType = PKCS10"
	oFile.WriteLine "KeyUsage = 0xa0"
	oFile.WriteLine ""
	oFile.WriteLine "[EnhancedKeyUsageExtension]"
	oFile.WriteLine "OID=1.3.6.1.5.5.7.3.1"
	oFile.WriteLine "OID=1.3.6.1.5.5.7.3.2"
	oFile.WriteLine ""
	oFile.WriteLine "[Extensions]"
	iLine = 0
	Do While iFile.AtEndOfStream <> True
	    sLine = iFile.Readline
	    If sLine = "-----END CERTIFICATE-----" then
	        Exit Do
	    end if
	    if sLine <> "-----BEGIN CERTIFICATE-----" then
	        if iLine = 0 then
	            oFile.WriteLine "2.5.29.17=" & sLine
	        else
	            oFile.WriteLine "_continue_=" & sLine
	        end if
	        iLine = iLine + 1
	    end if
	Loop
	oFile.WriteLine "Critical=2.5.29.17"
	oFile.WriteLine ""
	oFile.WriteLine "[RequestAttributes]"
	oFile.WriteLine "CertificateTemplate = DomainController"
	oFile.Close
	iFile.Close

	WS.Run sSharedDir & "RequestAndInstall.vbs " & sRequestInfo, 0, True

	' Sub
	Function ComputeASN1 (iStrLen)
	    If Len(Hex(iStrLen)) Mod 2 = 0 then
	        sLength = Hex(iStrLen)
	    else
	        sLength = "0" & Hex(iStrLen)
	    end if
	    if iStrLen > 127 then
	        ComputeASN1 = Hex (128 + (Len(sLength) / 2)) & sLength
	    else
	        ComputeASN1 = sLength
	    End If
	End Function

	'Return the domain role number where:
	'-1 Error
	'0 Standalone Workstation
	'1 Member Workstation
	'2 Standalone Server
	'3 Member Server
	'4 Backup Domain Controller
	'5 Primary Domain Controller
	Function GetLastDomainRole ()
	    On Error Resume Next
	    strComputer = "."
	    Set objWMIService = GetObject("winmgmts:\\" & strComputer & "\root\cimv2")
	    Set colItems = objWMIService.ExecQuery("Select DomainRole from Win32_ComputerSystem",,48)
	    For Each objItem in colItems
	        iReturn = objItem.DomainRole
	    Next
	    On Error Goto 0
	    GetLastDomainRole = iReturn
	End Function
Edit or create C:\Shared\Autoenroll\EnrollMachine.vbs
	Set WS = CreateObject("WScript.Shell")
	Set oFilesystem = CreateObject("Scripting.FileSystemObject")
	sRequestInfo = WS.ExpandEnvironmentStrings("%TEMP%") & "\autoenrolled.inf"
	Set oFile = oFilesystem.CreateTextFile(sRequestInfo, True)
	oFile.WriteLine "[Version]"
	oFile.WriteLine "Signature= " & Chr(34) & "$Windows NT$" & Chr(34)
	oFile.WriteLine ""
	oFile.WriteLine "[NewRequest]"
	oFile.WriteLine "Subject = " & Chr(34) & "CN=IgnoredValue" & Chr(34)
	oFile.WriteLine "KeyLength = 2048"
	oFile.WriteLine "MachineKeySet = TRUE"
	oFile.WriteLine "RequestType = PKCS10"
	oFile.WriteLine ""
	oFile.WriteLine "[RequestAttributes]"
	oFile.WriteLine "CertificateTemplate = Machine"
	oFile.Close

	sSharedDir = oFilesystem.GetParentFolderName(WScript.ScriptFullName) & "\"
	WS.Run sSharedDir & "RequestAndInstall.vbs " & sRequestInfo, 0, True
Edit or create C:\Shared\Autoenroll\EnrollUser.vbs
	Set WS = CreateObject("WScript.Shell")
	Set oFilesystem = CreateObject("Scripting.FileSystemObject")
	sRequestInfo = WS.ExpandEnvironmentStrings("%TEMP%") & "\autoenrolled.inf"
	Set oFile = oFilesystem.CreateTextFile(sRequestInfo, True)
	oFile.WriteLine "[Version]"
	oFile.WriteLine "Signature= " & Chr(34) & "$Windows NT$" & Chr(34)
	oFile.WriteLine ""
	oFile.WriteLine "[NewRequest]"
	oFile.WriteLine "Subject = " & Chr(34) & "CN=IgnoredValue" & Chr(34)
	oFile.WriteLine "KeyLength = 2048"
	oFile.WriteLine "RequestType = PKCS10"
	oFile.WriteLine ""
	oFile.WriteLine "[RequestAttributes]"
	oFile.WriteLine "CertificateTemplate = User"
	oFile.Close

	sSharedDir = oFilesystem.GetParentFolderName(WScript.ScriptFullName) & "\"
	WS.Run sSharedDir & "RequestAndInstall.vbs " & sRequestInfo, 0, True
Verify that all the file in Shared\Autoenroll directory has read end exec right for Everyone.
Install Certificate Templates by adding the corresponding Snap-in i the MMC console.
Install the root CA-certificate(s) in the NTAuthStore, so windows can verify all cerificates produced by EJBCA. Start Menu -> Administration -> Users and Computer -> Right click the domain name -> Properties -> Group Policy -> Edit Default Domain Policy -> Computer Configuration -> Windows Settings -> Security Settings -> Public Key Policies -> Trusted Root Certificate Authorities -> Import -> import the root ca certificate and run "gpupdate /force" on machines that are used for testing. (You can fetch the CA certificate using the EJCBA CLI with "$EJBCA_HOME/bin/ejbca.sh ca getrootcert AdminCA1 ~/AdminCA1.crt -der".)
Add Startup Scripts in Start Menu -> Administration -> Users and Computer -> Right click the domain name -> Properties -> Group Policy -> Edit Default Domain Policy -> Computer Configuration -> Windows Settings -> Scripts -> Startup -> Add the machine-related scripts from the shared directory.
Add Login Scripts in Start Menu -> Administration -> Users and Computer -> Right click the domain name -> Properties -> Group Policy -> Edit Default Domain Policy -> User Configuration -> Windows Settings -> Scripts -> Logon -> Add the user-related scripts from the shared directory.
Add the ca-server and shared directory to the Intranet Start Menu -> Administration -> Users and Computer -> Right click the domain name -> Properties -> Group Policy -> Edit Default Domain Policy -> Computer Configuration | User Configuration (do both!!) -> Administrative Templates -> Windows Components -> Internet Explorer -> Internet Control Page -> Security Page -> Site to Zone assignement list -> Enabled and added "https://ca-server.company.local" to zone "1", "\\Dc1\Shared" to zone "1"
Configure clients to synchronize time using NTP: Start Menu -> Administration -> Users and Computer -> Right click the domain name -> Properties -> Group Policy -> Edit Default Domain Policy -> Computer Configuration -> Administrative Templates -> System -> Windows Time Service -> Time Providers -> Configure Windows NTP Client (Add "dc1.company.local" as an NTP server.) and Enable Windows NTP Client.
Use "gpupdate /force" on clients before running tests or wait 8h.. =)
Debugging
Well, good luck with Windows error messages.. but you can enable debug ("debug=true" in autoenroll.conf) to see the response from the Servlet.
Test the machine-cert-retreival script by starting a Console as "LocalSystem". C:\Shared\Autoenroll\ConsoleAsLocalSystem.vbs:
	Set WS = CreateObject("WScript.Shell")
	WS.Run "sc.exe delete lsc", 0, True
	WS.Run "sc.exe create lsc binpath= " & Chr(34) & "cmd /K start" & Chr(34) & " type= own type= interact", 0, True
	WS.Run "sc.exe start lsc", 0, True
Test the machine-cert-retreival script by starting a Console as "LocalSystem". C:\Shared\ConsoleAsLocalSystem.vbs:
	Set WS = CreateObject("WScript.Shell")
	WS.Run "sc.exe delete lsc", 0, True
	WS.Run "sc.exe create lsc binpath= " & Chr(34) & "cmd /K start" & Chr(34) & " type= own type= interact", 0, True
	WS.Run "sc.exe start lsc", 0, True
Adding a custom Administrative template can be done as in this example if needed: Start Menu -> Administration -> Users and Computer -> Right click the domain name -> Properties -> Group Policy -> Edit Default Domain Policy -> Computer Configuration -> Administrative Templates -> Add/Remove Templates -> Add Autoenroll.adm
This is just a sample, but shows how a custom GP can be configured.. (Use the intructions above instead of this template. The example Administrative Template "Autoenroll Related" can be used to force ca-server.company.local into the Intranet zone or add a NTP syncronizing policy. C:\Shared\Autoenroll\Autoenroll.adm:
CLASS MACHINE

CATEGORY "Autoenroll Related"
    CATEGORY "NTP Synch for clients with AD"
     POLICY "Enable NTP synch"
      SUPPORTED "This is a hack to get WinXP clients working"
      EXPLAIN ".."
      KEYNAME "Software\Policies\Microsoft\W32Time\TimeProviders"
      VALUENAME "NtpServer"
      VALUEON NUMERIC 1
      VALUEOFF NUMERIC 0

       ACTIONLISTON
        KEYNAME "Software\Policies\Microsoft\W32Time\Parameters"
        VALUENAME "Type"
        VALUE "NTP"

        KEYNAME "Software\Policies\Microsoft\W32Time\Config"
        VALUENAME "AnnounceFlags"
        VALUE NUMERIC 5

        KEYNAME "Software\Policies\Microsoft\W32Time\Config"
        VALUENAME "MaxPosPhaseCorrection"
        VALUE NUMERIC 1099511627775

        KEYNAME "Software\Policies\Microsoft\W32Time\Config"
        VALUENAME "MaxNegPhaseCorrection"
        VALUE NUMERIC 1099511627775
       END ACTIONLISTON

      PART "NTP Servers in the form ntp.server1.com,0x1 ntp.server2.com,0x1 ntp.server3.com,0x1" EDITTEXT
       KEYNAME "Software\Policies\Microsoft\W32Time\Parameters"
       VALUENAME "NtpServer"
       MAXLEN 4096
      END PART

      PART "Poll interval in seconds" NUMERIC
        KEYNAME "Software\Policies\Microsoft\W32Time\TimeProviders\NtpClient"
        VALUENAME "SpecialPollInterval"
        DEFAULT 900
      END PART
     END POLICY
    END CATEGORY

    CATEGORY "Required trust"
     POLICY "Trust ca-server.company.local"
      SUPPORTED "Might need IE6 for this to work.."
      EXPLAIN "This adds the ca-server.company.local to the list of intranet-sites.."
      KEYNAME "Software\Policies\Microsoft\Windows\CurrentVersion\Internet Settings\ZoneMap\Domains\company.local\ca-server"
      VALUENAME "https"
      VALUEON NUMERIC 1
      VALUEOFF NUMERIC 0
     END POLICY
    END CATEGORY
END CATEGORY

CLASS USER

CATEGORY "Autoenroll Related"
    CATEGORY "Required trust"
     POLICY "Trust ca-server.company.local"
      SUPPORTED "Might need IE6 for this to work.."
      EXPLAIN "This adds the ca-server.company.local to the list of intranet-sites.."
      KEYNAME "Software\Policies\Microsoft\Windows\CurrentVersion\Internet Settings\ZoneMap\Domains\company.local\ca-server"
      VALUENAME "https"
      VALUEON NUMERIC 1
      VALUEOFF NUMERIC 0
     END POLICY
    END CATEGORY
END CATEGORY
Useful reg-for VMwares with runaway clocks if GP mod didn't work or you just want to modify a single client.
Windows Registry Editor Version 5.00

[HKEY_LOCAL_MACHINE\SYSTEM\CurrentControlSet\Services\W32Time\Config]
"AnnounceFlags"=dword:00000005
"MaxPosPhaseCorrection"=dword:ffffffff
"MaxNegPhaseCorrection"=dword:ffffffff

[HKEY_LOCAL_MACHINE\SYSTEM\CurrentControlSet\Services\W32Time\Parameters]
"Type"="NTP"
"NtpServer"="dc1.company.local,0x1"

[HKEY_LOCAL_MACHINE\SYSTEM\CurrentControlSet\Services\W32Time\Parameters\NtpServer]
"NtpServer"="dc1.company.local,0x1"

[HKEY_LOCAL_MACHINE\SYSTEM\CurrentControlSet\Services\W32Time\TimeProviders\NtpClient]
"SpecialPollInterval"=dword:00000030

[HKEY_LOCAL_MACHINE\SYSTEM\CurrentControlSet\Services\W32Time\TimeProviders\NtpServer]
"Enabled"=dword:00000001
References
- Kerberos authentication on Apache2, http://www.grolmsnet.de/kerbtut/
- MS Certificate requests, http://technet2.microsoft.com/WindowsServer/en/library/008acdeb-0650-4063-a9a2-1258b3229d4f1033.mspx
- Requirements for Domain Controller Certificates from a Third-Party CA, http://support.microsoft.com/kb/291010
Other auto enroll references
- ICertPassage remote protocol, http://msdn.microsoft.com/en-us/library/cc233162.aspx
- Windows Client Certificate Enrollment Protocol, http://msdn.microsoft.com/en-us/library/cc249820.aspx
- RedHat auto enroll proxy, http://directory.fedoraproject.org/wiki/Auto_Enroll_Documentation
EJBCA with GemSAFE Toolbox
This is a very thorough guide with screen-shots of how to setup EJBCA 3.6.0 with GemSAFE Toolbox in a windows environment for smartcard logon, email signing, email encryption and SSL services.
The guide is divided into three PDF-files:
Creating and Running a custom RA Administrator application using EJBCA Web Services and Java
A fully working RA Admin sample program, written using Java and EJBCA web services, may be downloaded from the WebServiceRA project on SourceForge.
This Java program provides a simple UI for creating and querying end entities. All communications with the appserver are via EJBCA web services.
It includes wizard dialogs that prompt the user for the type of certificate to create, that prompt the user to enter values that define the subject DN, that allow the user to receive an email notification containing the password for the new end entity, that allow the user to choose between adding the new end entity to the EJBCA database and actually generating the certificate (as a P12 or JKS file).
Further information on this application can be found in the project's README.txt (building and running the application), its troubleshooting.txt (further tips on running the application), and todo.txt (notes and issues for developers).
A short movie demonstrating the program may be downloaded from SourceForge or YouTube.
SensorNet PKI
This excellent HOWTO on PKI in general, LDAP, email and server setup has been kindly contributed by SensorNet. Please read this notice!
Documentation in French/en francais
Bruno Bonfils have written some documentation in french